Wednesday, August 31, 2011

New Obsessions

So, I have been introduced to Pinterest and am now officially hooked! This says it all...

I'm addicted...

I think to see what I have found so far, you can click here. Follow Me on Pinterest
Feel free to post comments, repin, like or do whatever with the things that I have found.

While browsing yesterday, I was inspired in more ways that I will ever have time to create, but I tried my first recipe from a pin I found this morning! This recipe (http://under400.tumblr.com/post/3334930421/egg-and-spinach-quiche-cups-10-ounces-frozen) is also a new obsession, just like Pinterest is...it is basically egg muffins. And by egg muffins, I mean like you would make an omlette but in muffin tins. Don't they just look delish! It is one of those things that you see and are like "why didn't I think of that!?"
Egg and Spinach Quiche Cups
 10  ounces  frozen chopped spinach   
 3/4 cup egg whites   
 3/4 cup  shredded  			 				 			fat free cheese   
 1/4 cup red bell pepper, chopped   
 1/4 cup  onion, chopped fine   
  hot sauce			 			 						 (optional) 
 Microwave the spinach on high for 2 1/2 minutes.  Drain completely.
Line a 12 cup muffin tray with foil baking cups.  Spray the cups with cooking spray.
Combine the egg substitute, cheese, mushrooms, spinach and onions in a bowl.
Add hot pepper to taste.
Divide evenly among the cups.
Bake at 350 for 20 minutes or until knife inserted comes out clean.
May then be frozen if desired.

Makes six muffin cups, 75 Calories each
I had 3 containers of egg whites that were about to expire, no breakfasts for in the morning, and no time most mornings to make a breakfast with something as yummy and healthy as eggs...UNTIL I found this little gem. They were super easy to make a double batch and freeze some, however I will definitely make some changes going forward because this is how mine turned out:

Not quite like the ones from the good blog where I got the idea, huh. Well, as I was pouring the mix into the tins, all the goodies like the onions, green peppers and cheese, seemed to stay behind. So I tried to scoop some out and fill each tin evenly, but I didn't do so well. Also, the 2nd batch (at the bottom half of the picture) seems to have gotten a lot more of the cheese. Oh well! They might look awful, but man they are just as yummy as I had hoped! I have them in sandwich baggies now so I can just grab and go in the morning. I can eat them by themselves or on an english muffin or something. Can't wait to try it tomorrow - and to see if the hubby likes them enough to stop polluting his body with 3x/week 'mcmuffins'!


Saturday, April 3, 2010

The Window Seat Toy Box

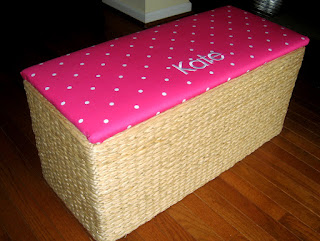
So, during one of my weekly trips to Joann Fabrics I stumbled across this great basket weave storage bench in the kids storage section. While I wasn't big on the fabric on it, I did like the basketweave part of it as well as the sale price (not to mention my coupon for an additional 20% off!). I added an extra layer of padding to fatten it up a little then embroidered Kate's name along one of the PB Kids corkborad slipcovers that I got for Kate's room since I had an extra one. It helps tie it all together. (Someday I will get around to taking a picture of her room, including the cover I made for the cushions on the glider and her bumper that I also made.) I attached it all to the lid then reattached the lid to the base. I ended up liking it so much I went back to get another one to use somewhere in the house, maybe the laundry/mud room or in the play area...we'll just have to see where it ends up!

In the meantime, here is the original one:

Here is it is finished and ready for some toys:

Wednesday, March 31, 2010

New Nook

So, I finished the second barstool and the breakfast nook is all set. It is just begging to be used for some afternoon tea and snacks, isn't it! Time to open the windows and get some fresh air.


Tuesday, March 30, 2010

I guess I'll give it a try

Ok, so I have been really inspired by projects around the house and other people's blogs lately, so I decided to give it a try myself. Let's be honest, I needed somewhere to put my pictures of my projects to show my family, haha. But, I figured that since I was getting inspirpation from other people, just maybe by posting some things I could provide some to someone else out there looking just like I was.  My hope is that visitors to this blog will either: be inspired to try a project, get a good laugh at my attempts at a project, or even just feel entertained for the few minutes that they are here. Again, I realize that this will mostly be you, my loving parents and aunts that are always interested when I want to show off my latest attempts :-) Don't be surprised if I throw in the occasional story and picture of my daughter because when it comes to inspiration of any kind, she (along with my handsome hubby) is my best source of it!

So, to get the ball rolling I will start with the counter height bar stool that I wanted to recover just in case we do find out we are getting that new house (long story). And really, the black and gray cover it came with was just bugging me! It was never meant to stay on it as long as it did - this project was long overdue. They are just simple IKEA chairs that I took apart the cover of to use as a pattern for the new cover. Since they had a bit of stretch to them, it was a bit of a gamble using a non-stretch fabric but it worked pretty well, I think.  Thanks to http://www.dana-made-it.com/ for getting me moving on this one. I loved her idea of the oilcloth, especially for the little ones, but wanted to use a fabric to coordinate with the new dining room chairs for the first few months. Plus, it is a slipcover so it can be washed in the meantime. Once Kate is big enough to climb on (and dirty up) these chairs, you can be certain I will be following in Dana's footsteps with the oilcloth!

Before:

Here is the first one (the second is almost done)